plants

Create Your Own Oasis with a Spa-Style Bathroom by Margaret Chambers

Greenery adds an organic touch to this spa-like bathroom we designed in a Colorado vacation home. Lately, we’re encouraging clients to do heated floors in their primary bathrooms. This heated floor is made of Ann Sacks Sully Noir limestone.

Stepping into a spa is like stepping into another world. You can leave your worries at the door, and feel restored and ready to face another day. As a professional interior designer, I’ve created healing spaces for many of my Dallas clients. Below, you’ll find my professional tips for designing a spa-style bathroom in your own home.

Step 1: Set the Stage with Beautiful Flooring

Marble is a popular choice for bathroom flooring (as well as backsplashes and vanities) because it is both water-resistant and luxurious. Regardless of what type of stone or tile you choose for your flooring, larger tiles will have a cleaner look than smaller ones. The more tiles you have, the more grout lines there are.

Stone floors can be cold to the touch and dangerous when slippery. A plush rug prevents slippage and gives your feet a soft landing area when you step out of the shower. Make sure your rug is made of a quick-drying material (such as cotton, bamboo, or wool) to prevent mold or mildew growth.

Believe it or not, it’s possible to use wood flooring in a bathroom if you coat it properly to protect it against water damage. We used extra coats of polyurethane on the wood floors in this bathroom.

If you’re designing your bathroom from scratch, take a moment to consider if you want a wet room. A wet room is an open-concept bathroom where everything is waterproof. There is little to no separation between the walk-in shower, the freestanding tub, and the rest of the bathroom. The clean lines and simplicity of a wet room bring a spa to mind. The downside of wet rooms is that they can feel hard and cold. You can make them more comfortable by adding a water-resistant shower bench for seating and installing heated tiles.

Step 2: Organize

Have you ever seen a cluttered spa? If you want your bathroom to be a place where you can truly unwind, you’ll need to make it a clean and minimalist environment. Look for expired products or items you haven’t used in a long time, then discard them. Then, decant your lotions, liquid soaps, shampoos, etc. into matching dispensers for a cohesive look.

This room was pretty small for a primary bathroom, so we had to get creative to maximize space. We built towers on either side of the his-and-her vanities to add more storage. Hot-rollers, hairdryers, electric toothbrushes, etc. could be plugged into the towers.

Cotton rounds and Q-tips can be removed from their plastic containers and put into glass jars. Store as many items as you can out-of-sight; counter space should be reserved for items you use daily. Trays, baskets, or drawer organizers can help you group similar items together. Instead of a standard bathroom trash can, try a more charming alternative like a woven basket. Any towels that are visible should be neatly folded or rolled up.

Step 3: Tone Down Your Color Scheme

Color can affect our psychological state, so it’s no surprise that spas tend to have calming, nature-inspired color schemes. A spa-like bathroom could feature shades of white, light blue, seafoam green, muted pink, soft gray, or beige. Towels should be white, cream color, sand, or olive green.

Stay away from bold colors, high-contrast color combinations, or busy patterns. Also, keep in mind that the light bouncing off of dark or bold wall colors can reflect on your skin, making it tricky to assess how your makeup looks.

The blue-and-white wallpaper with birds creates a soothing setting for this primary bathroom in a University Park home. Bright brass accents add just the right amount of sparkle.

Step 4: Adjust Lighting

Spas typically have subdued, warm lighting. After all, there’s nothing more relaxing than a candlelit bath. If your lighting is too bright and “cold,” it promotes a feeling of alertness and makes it harder to relax. Of course, there are times when you want to be able to see clearly, too. Dimmable lights help you control the brightness levels, giving you the best of both worlds. During the day, you’ll want to maximize the natural light in the room. Add window treatments to any large windows so that you can have privacy, day or night.

Step 5: Decorate Your Walls Carefully

Any art you hang in your spa bathroom should be at least a little understated. Nature-themed art is a safe choice, along with abstract watercolors and minimalist designs. If your bathroom feels a little cramped, try adding more mirrors to the walls. Using mirrors is a tried-and-true designer trick for making a small room seem larger.

Seen here is a seating area in the primary bathroom of a Turtle Creek home we designed.

Step 6: add Places to Rest

Consider getting a stool for your vanity so you can get ready for the day either standing or sitting. An extra sitting area or reading corner also helps signify that this bathroom is a place to relax and unwind. Make sure that any upholstery you choose can withstand steam. Indoor/outdoor fabrics are a good option.

Step 7: include Luxury Accessories and Features

If you want to go the extra mile, you could even add a sauna (wet or dry) or a steam shower to your bathroom. Other luxurious upgrades include adding heated toilet seats, or replacing your standard shower head with a rain showerhead.

A bathtub tray makes every bath feel a little more special. You can use it to hold a candle, a drink, a book, or bath products. Another often-overlooked accessory is a towel warmer. Stepping out of the shower into the cold isn’t so bad when a fluffy, freshly-warmed towel is close at hand. Try adding a few drops of essential oil to the bottom of the pile of towels to suffuse them with a pleasing scent.

Step 8: Bring Nature into the room

Greenery is an essential element for a peaceful environment. If you don’t have the best track record for keeping indoor plants alive, consider getting faux plants instead. There are many lifelike options on the market these days. An unused corner is the perfect spot for a faux tree. If you do choose live plants, research the amount of light they’ll need, and make sure they can thrive in a humid environment.

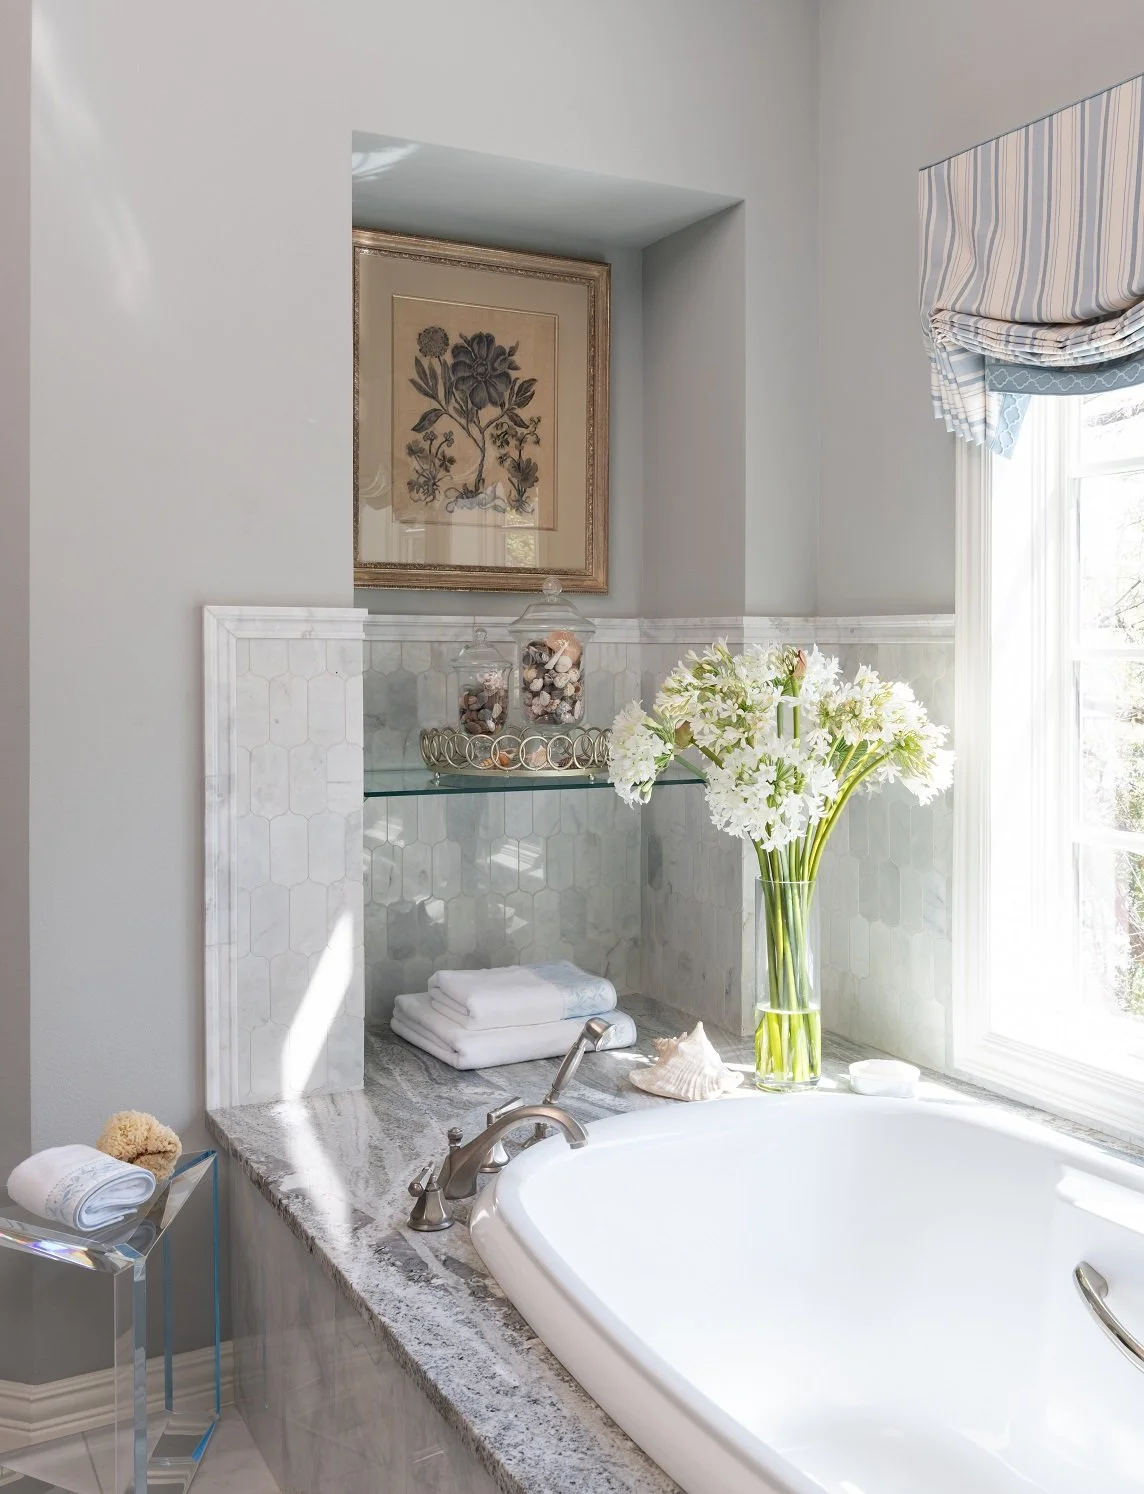
This bathroom has a lot of nature-themed accessories, such as the botanical print on the wall, the jars of seashells over the bathtub, and the vase of fresh flowers.

Step 9: Set the Mood

By using a portable speaker, you can fill the room with your own spa playlist. Spas often play instrumental music at a low volume. Appropriate genres include soft classical music, lounge music, and ambient music.

Scents can also have a profound impact on our state of mind. To recreate that “spa smell,” try diffusing essential oils, lighting scented candles, or using scented bath products such as bath salts, shower oils, and scented soaps. Rosemary, lavender, eucalyptus, and peppermint are all scents that promote relaxation. Another way to introduce a calming scent into the bathroom is by hanging a bundle of fresh or dried eucalyptus in your shower. Shower steam will activate its calming scent (note that eucalyptus is toxic for both cats and dogs).

Designing a spa-like bathroom can be a complex undertaking, but even simple changes like decluttering or updating your color scheme make a big difference. If you’re planning on going all-out, an interior designer like myself can guide your project and make sure there are no missteps. The results are worth it. After all, when you have a spa-style bathroom in your own home, any day can be a spa day. You can reach Chambers Interiors by calling our Dallas office at 214-651-7665 or emailing us at margaret@chambersinteriors.com.

Related Articles:

How to Keep Your Home Beautiful When You Have Pets by Margaret Chambers

We used a Sunbrella fabric for this sofa in a Kessler Park home. Sunbrella is easy to clean up and great for sun resistance.

According to the American Veterinary Medical Association, 45.5% of Americans own dogs, while 32.1% of Americans own cats. As an interior designer, I need to know how to design homes for all of my Dallas clients, including those with small children or pets.

Designing a pet-friendly home presents several unique challenges. Even well-behaved pets can cause a lot of wear and tear on a home over time. Dog crates, dog beds, litter boxes and cat trees also stick out like a sore thumb. Thankfully, there are ways to protect your furnishings and disguise pet clutter without compromising on style.

Buy Heavy-Duty Fabrics

Indoor/outdoor rugs are the best choice for a home with pets. Rugs can also be treated to protect them against stains, making them easier to clean when accidents happen.

Any pet owner knows that keeping dogs and cats off furniture can be a losing battle. That’s why it’s important to choose durable fabrics, especially in the rooms your pet spends the most time in. Examples of high-performance fabrics include Sunbrella, Krypton, microsuede, microfiber, canvas, and indoor/outdoor fabrics. Another option is scratch-and-stain-resistant leather. If your pet has a favorite chair or a favorite spot on the couch, you can put a blanket there to keep their hair off the furniture itself.

Pet beds give your furry friend another place to rest—and shed hair—besides your furniture. Make sure to find one with a washable cover and a fabric color that complements the rest of the room.

If you own cats, stay away from anything with an open-weave that they can get their claws in. Avoid looped carpet, boucle, and tassel rugs, which some cats love to chew on. Performance velvet is a good choice that often deters scratching. Although pet hair and lint clings to velvet, it can be easily vacuumed off.

Rugs made of a tight wool weave can withstand scratching. Since cats can get their claws into loop pile rugs, I’d advise cat owners to choose cut pile rugs instead. Remember to secure your rugs to the floor with rug tape or rug pads.

Hide Pet Items in Plain Sight

Litter boxes and small dog crates can be discretely hidden inside modified cabinets. Search online for “litter box enclosures” or “dog crate furniture” for ideas. Large dog crates can be hidden under a tabletop with a tablecloth.

Nowadays, you can find cat trees or scratching posts that are designed to look like art pieces. Wall-mounted cat beds or cat shelves also give your cat a cozy perch to survey the room, without using up floorspace.

Owning multiple pets means you’ll have a lot of food and water dishes cluttering the kitchen floor. One popular solution is to build a kitchen island with a nook at floor-level for storing pet dishes—something to consider if you’re building a new home or remodeling your kitchen. A shallow toe-kick door can also be repurposed as a cat feeding station.

Pet toys can be stored in a bin or a woven basket with a lid to keep them out of sight. Consider putting your cat and dog treats in pretty jars instead of leaving them in their original packaging.

Vet Your housePlants

Does your cat love to nibble your houseplants? Offer them “cat grass,” which they can safely munch on, instead. You could also try decorating with faux plants instead of live ones. Before adding any live plants to your home, you should always make sure that they won’t be toxic for your pet. You can find a full list of plants that are dangerous for dogs or cats on the ASPCA website.

stay on top of grooming

When you are diligent about grooming your pet, it helps keep your home clean, too. Brushing or bathing your pet removes any hair that would otherwise end up on your floor or furniture. Animal hair leaves behind an oil that attracts dirt, so make sure to vacuum it off furniture at least twice a week.

Luxury vinyl tiles are a great flooring option for a home with pets because they’re easy to clean and durable. Vinyl tiles can even come with a faux wood finish. Avoid high-gloss tiles, which will highlight dirt and pawprints.

You can help protect your floors by regularly trimming your pet’s nails. Seen here is a photo from the foyer in a Dallas home we designed.

If you’re in the process of building a new home, plan ahead on where you want to bathe your pet. The mudroom is the perfect place for a washing station because you can take care of your pet’s muddy paws as soon as they return from the outdoors. A walk-in shower with an extra-long nozzle is another solution.

Even if you’re not allergic to your pet, it’s not a bad idea to use an air purifier. Air purifiers reduce allergens in the home and help cut down on pet odors too.

Keep Collectibles Out of Reach

There’s no need to leave your shelves bare if you have pets. Just take precautionary measures to make sure that no accidents (or intentional sabotage) happen. For starters, keep any accessories up and out of range of your dogs’ tails. Dealing with cats is trickier because they love to jump up high and knock things off of shelves. Try securing decorative objects with earthquake putty, or choose bottom-heavy pieces. For example, a vase can be filled with aquarium gravel to make it harder to move. Place your heaviest objects (like crystals) on the lowest shelves. Especially delicate or valuable items should always be kept in a glass display case.

Plastic table toppers help protect your wood coffee tables from scratches. When decorating your coffee table, gather your small objects in a tray. That way, even if the cat knocks them over, your items should be contained in the tray.

If you’re having trouble finding durable home goods that fit your home’s style, you could always contact an interior designer. Some of my favorite published projects have been for clients who owned dogs. Just because you live with pets doesn’t mean you have to settle for less. By choosing your fabrics wisely, and finding clever ways to disguise pet paraphernalia, you can keep your dream home looking beautiful for years to come. To schedule a consultation with Chambers Interiors, call our Dallas office at 214-651-7665 or send an email to margaret@chambersinteriors.com.

RELATED ARTICLES:

Freshen Your Home for Spring With These Designer Tips by Margaret Chambers

This bedroom in a Turtle Creek home feels like spring all-year-round with its pink check lampshade, pink wallpaper, and beautiful linens.

Spring is the perfect time to declutter, tackle home improvement projects, and breathe new life into your rooms with seasonal colors and accessories. By starting the process now, you have the whole rest of the year to enjoy the fruits of your hard work. As a Dallas interior designer, I have many years of experience helping my clients renovate or refresh their homes. These are my tips for getting your home ready for spring.

Decluttering is a no-cost way to give your home a fresh start. Take a look at your belongings to see if there’s anything you haven’t used in a long time. Now is also the time to rotate your heavy linens and winter clothing into storage. When it comes to clutter, the entryway is a common hotspot. If you’re the type to drop off keys, mail, and sunglasses as soon as you get home, pick a place where they can go, such as a pretty decorative bowl.

Have your rugs and carpets professionally cleaned (or rent a steam cleaner). Wash your windows too so you can take full advantage of the spring sunshine.

You can filter in even more spring sunshine by replacing dark drapes and shades with light and sheer curtains, like the ones in this Dallas home.

Many Texas homeowners worry about leaks this time of year. If you’re one of them, consider getting leak detectors; they’re a quick way to solve a problem before it ever happens. Detectors can be placed underneath sinks, behind toilets, underneath hot water heaters, and behind washing machines. You can also help prevent leaks by making sure that your roof stays in good condition.

If you don’t want to renovate but still think your home could use a facelift, consider repainting your front door or your interior walls. A new paint color will instantly change the energy of a space. Don’t forget about your fifth wall—your ceiling. Painting the ceiling a different color or adding wallpaper has become a trend in recent years.

You can get your bedroom ready for the season by swapping out your comforter with a thinner coverlet. Replace dark sheets with ones in lighter colors (like crisp white) with bordering or monogramming, depending on the style of the room. Bedding with botanical prints will really complete the theme.

Crisp white bedding with bordering and monogramming is a popular look.

Small design elements, such as hand towels, lampshades, accent pillows, and blankets can be easily switched out for items in seasonally-appropriate colors, like pastel yellow, pink, orange, or green. And nothing says “spring” like fresh flowers or Easter-themed accessories. Flowers associated with the spring season include daffodils, tulips, and hyacinths. Adding more potted plants to your home can improve air quality while introducing an organic element to your interior design.

Instead of buying all-new furniture, try rearranging the furniture you already have. You might be able to find a new layout that has more breathing room or is easier to navigate. Rehanging or rearranging your art is another way to shake things up.

The garden theme for this table setting is perfect for spring. The china has hand-painted botanical and butterfly motifs.

Freshening your home for spring can be as simple as swapping out decorative pillows or cleaning your closet. But if you’ve got bigger plans—like renovating your house, or changing the entire color scheme—consider tapping into an interior designer’s expertise. In my own design projects, I love to work with soft, spring-like colors. I’m passionate about helping my clients transform dark or dated spaces into classically beautiful homes that will look gorgeous in any season.

Interested in working with Chambers Interiors & Associates? You can reach us by sending an email to info@chambersinteriors.com or calling our Dallas office at 214-651-7665.

RELATED ARTICLES:

Add Serious Style to Your Bookshelves With These Five Steps by Margaret Chambers

It’s important to leave some negative space on each shelf so that the items have “breathing room.”

It’s important to leave some negative space on each shelf so that the items have “breathing room.”

Although shelves are rarely the focal point in interior design, it can’t be denied that cluttered, carelessly decorated shelves will distract from an otherwise immaculate space. If you’re redecorating your Dallas home and could use some help making your shelves look both clean and stylish, try following these five steps.

1: Edit Your Collections

We used a grasscloth wallpaper in the back of this bookcase for added depth, texture, and color.

We used a grasscloth wallpaper in the back of this bookcase for added depth, texture, and color.

To start with, remove all of the items on your shelves and go through them. Edit out anything that you either don’t love anymore or that clashes with the rest of your decorating scheme. This is also a great time to look at your bare shelves and decide if those could use an update, too. I like to add fabric or wallpaper to the backs of bookshelves to give them more depth and flair.

For a professionally designed look, keep in mind that interior designers usually decorate shelves with fewer items than the average homeowner. Cutting down on clutter gives each object more impact.

If you’re starting with a clean slate and could use some shopping tips, look for trays, small bronzes, boxes, antique tea caddies, vases, picture frames, and small art prints in addition to your books. Leaning a framed art print or photo against the back draws the viewer’s eye deeper into the shelf.

Organic accessories, such as petrified wood, geodes, coral, shells, and rattan baskets help give your shelves a variety of textures. Small potted plants (whether faux or live) add some refreshing greenery to your shelves too.

2: Pick Your Main Colors

Bookshelves should have a unified color scheme whenever possible. I recommend picking two complementary colors, adding in one type of metal, and using any number of neutral colors in-between.

3: Place Your Largest Items First

After you’ve narrowed down your selections, place your largest items on the shelves first. These can include stacks of coffee table books, baskets, vases, sculptures and trays. Some of these pieces may be large enough that you can put them on a shelf standalone.

The shelves in this Preston Hollow library are stained black, creating a dramatic backdrop for the clients’ books and objet d’art.

The shelves in this Preston Hollow library are stained black, creating a dramatic backdrop for the clients’ books and objet d’art.

4: Organize Your Books

Next, gather together all the books you’re using. If you have lots of books, you can group them by color.

Experiment with arranging books vertically, leaning them, or stacking them horizontally. A horizontal stack should have at least three books. If any of your books have unattractive spines or do not match your color scheme, turn them around so that the pages are facing out instead.

The blue-and-white china and the books on these shelves are all color-coordinated with the rest of the room.

The blue-and-white china and the books on these shelves are all color-coordinated with the rest of the room.

Some formulas for combining books and accessories include:

·        Putting books, a bookend, and a decorative bowl or basket together on a shelf

·        Setting a ball-shaped accessory against leaning books and adding a vase

·        Holding a set of books upright with a horizontal book stack that has a decorative object on top

5: Add the Finishing Touches

Once you’ve found a place for your large and medium items, use your small items to fill in any awkward gaps. That said, don’t fill out every shelf completely. A little negative space helps give your collections some “breathing room.”

As you arrange your shelves, make sure to vary the heights, pairing tall and short items together. Don’t be afraid to show your personality: shelves are the perfect place for travel mementos, family photos, and collectibles.

Before you finish decorating, take a step back to see how all the shelves in a room work together. It’s important to have some repeating colors or objects evenly distributed throughout the shelves, but it can be tricky to achieve the right balance. For example, if you have two gold objects on two adjoining shelves, you may want to move one of them to a further away shelf to balance things out.

A mixture of potted plants, porcelain jars, books, and picture frames fill these shelves we designed for a Plano home.

A mixture of potted plants, porcelain jars, books, and picture frames fill these shelves we designed for a Plano home.

One way to balance a tall shelving unit is to fill the four corner shelves with similar objects. These corners create a visual “frame” that bring everything together in the center shelves. To style a long shelf, create distinct vignettes that gently touch each other around the edges.

None of these design rules are set in stone, so don’t be afraid to experiment until your shelves feel right to you. And most of all, don’t forget to have some fun too. Shelves are a great opportunity to express a story about yourself. The end result shouldn’t look too staged, but rather, tell the world about who you are.

Having trouble editing down your collections? Getting a professional second opinion from an interior designer is invaluable. To contact us, send an email to info@chambersinteriors.com or call our Dallas office at 214-651-7665.

RELATED ARTICLES: